Jenkins Pipelines: Automate Build & Deploy across Dev, UAT, Prod
This is the second blog post in the Jenkins Series, in case you've not read the earlier post about introduction & jenkins job creation then kindly refer
https://hashnode.com/post/clsese24g000008l0c3f7bluv
A Jenkins Pipeline is a workflow in which a group of events or jobs are chained and integrated with each other in a sequence.
It is a process of continuous delivery automation using jenkins jobs
It will have a lifecycle of Build-Deploy-Test-Release
Architecture of a pipeline
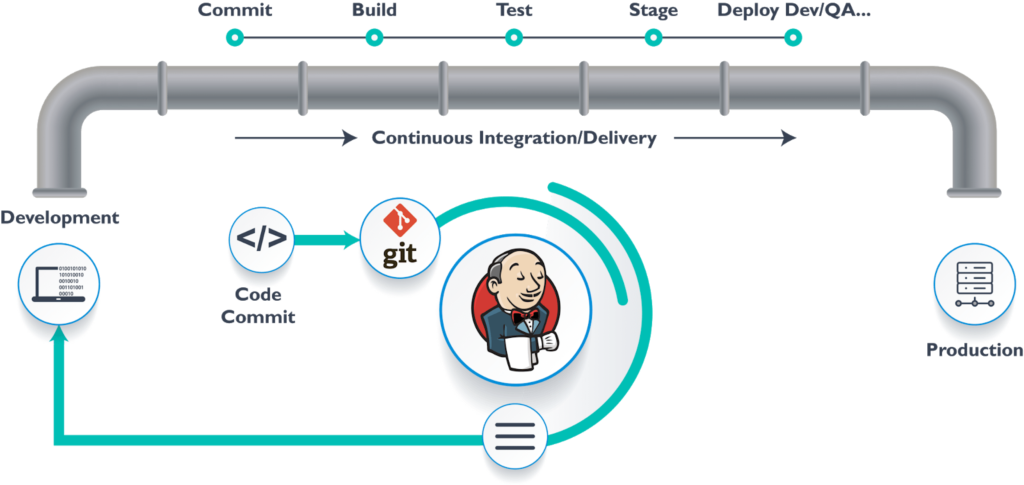
Take a look at the below image (taken from another source) which shows the various steps in a Jenkins pipeline

Developer commits the code into git which starts the CI process and it is deployed into the dev environment
Then the sequence of steps happen - Commit -> Build -> Test -> Stage
- If the job fails in build step then it won't go to the test step.
Types of pipelines
Build Plugin - Use it when the application have less tasks to execute
Declarative - In case the app have multiple steps like Dev, Code Review, Unit testing, code coverage test, Load/Integration test, packaging etc.
Scripted - Same as Declarative
Real time Use Case
If there is a use case to create the pipeline for Dev-UAT-Prod then its better to go with a Build Plugin as its simple.
Create a new job for Dev Env
Go to Jenkins homepage -> Click on New Item -> Enter name as "Dev" (or any custom name) -> select Freestyle project
Select Github project in the options and provide the URL (new repository that was created in github)
Select Source Code Management as Git and provide the credentials of the jenkins in username and password.
Select the branch (Main/feature branch)
Build Triggers and Build Environment are respectively used to define schedules for the build and what is supposed to happen after the build.
Under the Build Steps, select Maven/Gradle and then give the goal as install which will execute each time a build is triggered in Jenkins.
- In case of maven, select "Invoke top-level Maven targets"
At last click on "Apply" to save all the changes.
Jobs for UAT and Prod environment
Follow the exact same steps (1-7) as its for Dev except providing the name and description for UAT/Prod accordingly.
Create a Pipeline
Prerequisite - Go to Jenkins Dashboard -> Mange Jenkins -> Plugins -> Search for "Build Pipeline" and install. Refer the below image for the navigation.

Go to Jenkins Dashboard and click on "+" icon as its in the below screenshot

Create a new Build Pipeline view
Provide the name and description
In the pipeline flow options, select initial job as "Dev" (UAT and Prod will be displayed along with Dev in the dropdown)
Leave the default trigger options as it is and select the No. of Displayed Builds as "5"
Click Apply
Changes in Jobs
Go to Jenkins Dashboard -> UAT job -> Build Triggers -> Select "Build after other projects are built" option and click on Apply like in below screenshot which is a sample one.

Perform the same step for Prod job as well.
Trigger the pipeline
Do a small change in your code & commit into Github which will trigger the Dev pipeline. Once its completed then UAT will run and after its completion, prod will start to run.
If there is an issue in the Dev job then UAT will not run unless Dev is fixed.